 Save to Pinterest
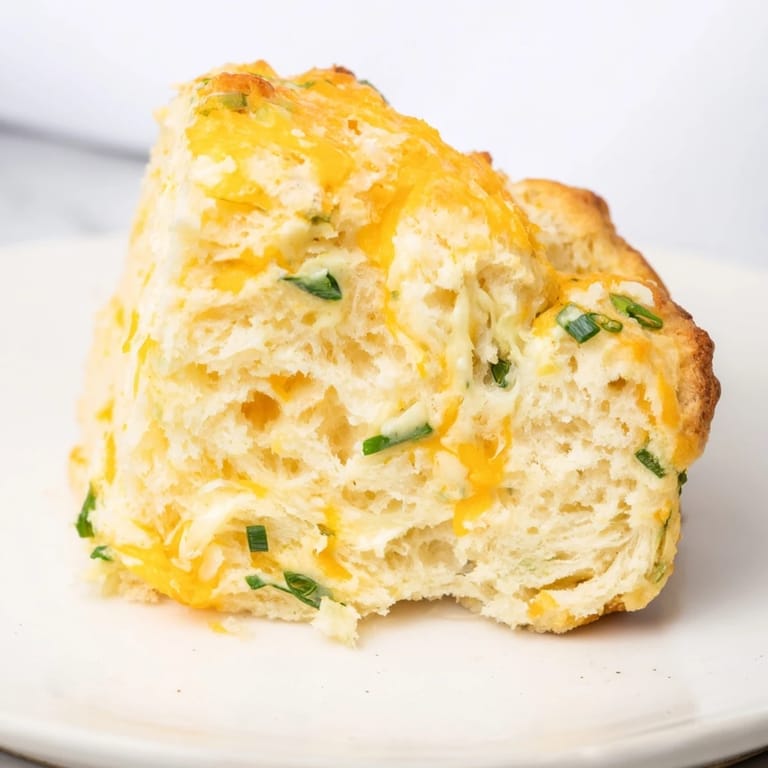
 I started making these scones on a gray Saturday morning when I had too much cheddar in the fridge and a craving for something warm and savory. The dough came together so quickly that I had them in the oven before my coffee finished brewing. When they emerged golden and fragrant, I ate one standing at the counter, butter melting into the flaky layers. My neighbor knocked on the door an hour later asking what smelled so good, and I handed her one still warm from the second batch.
I once brought a basket of these to a brunch potluck, and they disappeared faster than the pastries people had ordered from fancy shops. Someone asked if I'd trained in pastry, and I laughed because I'd just learned to keep the butter cold and not overthink the dough. That day taught me that simple, well-executed recipes often outshine complicated ones.
What's for Dinner Tonight? 🤔
Stop stressing. Get 10 fast recipes that actually work on busy nights.
Free. No spam. Just easy meals.
Ingredients
- All-purpose flour: The backbone of tender scones, measured carefully and not packed into the cup.
- Baking powder and baking soda: This duo gives the scones their signature lift and light crumb.
- Fine sea salt and black pepper: Salt amplifies the cheddar, while pepper adds a subtle warmth that rounds out the flavor.
- Cold unsalted butter: The secret to flaky layers is keeping the butter ice-cold and cutting it in until it looks like pebbles.
- Sharp cheddar cheese: Grate it yourself for the best melt and flavor, pre-shredded cheese can turn gummy.
- Cold buttermilk: Adds tang and keeps the dough moist without making it sticky.
- Large egg: Binds everything together and enriches the dough.
- Fresh chives: Finely chopped and folded in at the last moment so they stay bright green and aromatic.
- Heavy cream: Brushed on top for a beautiful golden finish.
Instructions
- Preheat and Prep:
- Set your oven to 400°F and line a baking sheet with parchment so the bottoms dont stick. This high heat is what creates those crisp edges and tender centers.
- Mix the Dry Ingredients:
- Whisk together the flour, baking powder, baking soda, salt, and pepper in a large bowl. Make sure theyre evenly distributed so every bite has balanced flavor.
- Cut in the Butter:
- Add the cold cubed butter and work it into the flour with a pastry cutter or your fingertips until the mixture looks like coarse sand with some pea-sized bits. Dont rush this step, those butter pockets are what make the scones flaky.
- Add Cheese and Chives:
- Stir in the grated cheddar and chopped chives gently, just until theyre evenly scattered through the mixture.
- Combine Wet Ingredients:
- Whisk the buttermilk and egg together in a small bowl, then pour it into the dry ingredients. Stir with a fork until the dough just comes together, it should look shaggy and a little rough.
- Shape the Dough:
- Turn the dough onto a floured surface and pat it gently into a 1-inch thick round. Handle it as little as possible to keep the texture light.
- Cut and Arrange:
- Slice the round into 8 wedges and place them on the baking sheet with a little space between each one. They wont spread much, but they need room to breathe.
- Brush and Top:
- Brush the tops with heavy cream and sprinkle with extra cheddar if you want a cheesy crust.
- Bake:
- Slide them into the oven and bake for 16 to 18 minutes, until theyre puffed and golden. Your kitchen will smell like a dream.
- Cool Slightly:
- Let them rest on the pan for a few minutes before serving. Theyre best warm, with butter melting into every layer.
 Save to Pinterest
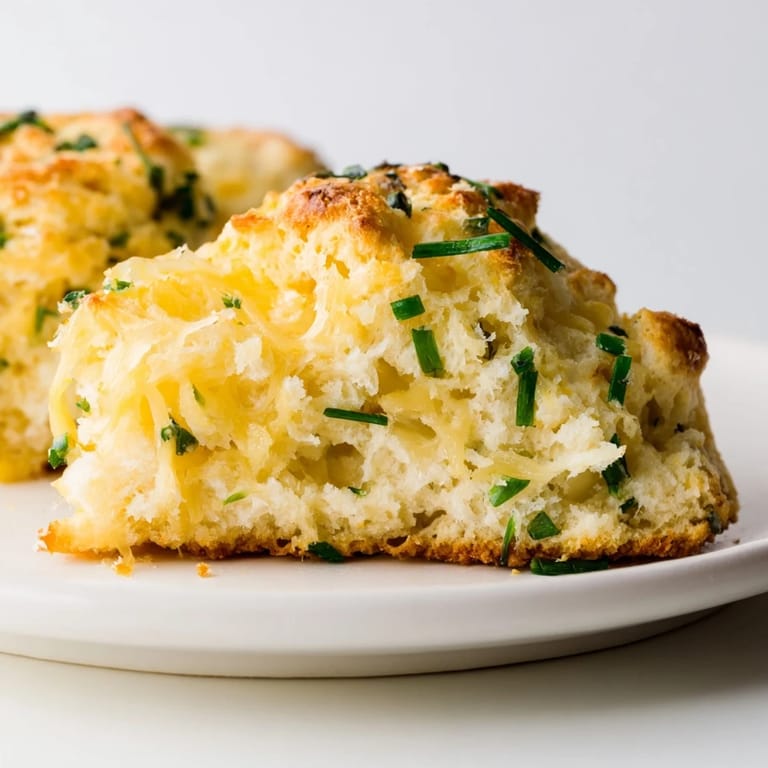
 One morning I made these for my sister who was visiting, and she told me they reminded her of the savory scones we used to buy at a little bakery near our old apartment. We sat at the table with tea and butter, talking until the sun moved across the floor. That batch didnt even make it to lunch.
Flavor Variations
Ive swapped the cheddar for gruyere and added thyme, and Ive also tried crumbled feta with dill for a Mediterranean twist. A pinch of cayenne or smoked paprika in the dry ingredients adds warmth without overpowering the cheese. If you dont have chives, green onions or parsley work beautifully too.
Storage and Reheating
These scones are at their best within a few hours of baking, but they keep well in an airtight container for up to two days. I freeze extras in a zip-top bag and reheat them in a 300°F oven for about 10 minutes, they come back to life with crisp edges and soft centers. Avoid the microwave, it turns them rubbery.
Serving Suggestions
I love these scones alongside scrambled eggs and fresh fruit for a lazy weekend breakfast. Theyre also perfect split and filled with smoked salmon and cream cheese, or served warm with a bowl of soup. Sometimes I just eat one plain with salted butter, and it feels like enough.
- Serve them with whipped butter or creme fraiche for extra richness.
- Pair them with a simple green salad for a light lunch.
- Bring them to a brunch and watch them disappear before anything else.
 Save to Pinterest
 These scones have become my go-to whenever I want something comforting and quick, and theyve never let me down. I hope they find a place in your kitchen the way theyve found one in mine.
Recipe Q&A
- → What makes the scones tender and flaky?
Using cold cubed butter cut into the dry ingredients creates small pockets for steam during baking, resulting in a tender, flaky texture.
- → Can I substitute buttermilk in the mixture?
Yes, an alternative is 2/3 cup milk mixed with 2 teaspoons lemon juice for a similar tangy effect.
- → How should I store leftover scones?
Store cooled scones in an airtight container at room temperature for up to two days or freeze for longer storage.
- → What additions enhance the flavor profile?
A pinch of cayenne or paprika can add a subtle spice that complements the cheddar and chives.
- → What is the best way to reheat frozen scones?
Reheat in a low oven until warmed through to maintain their texture and flavor.