 Save to Pinterest
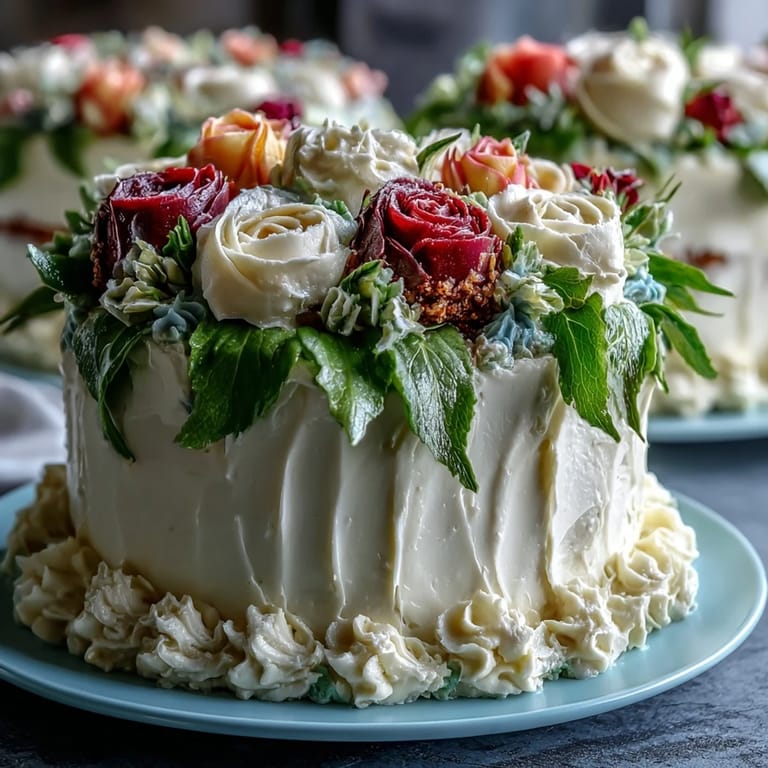
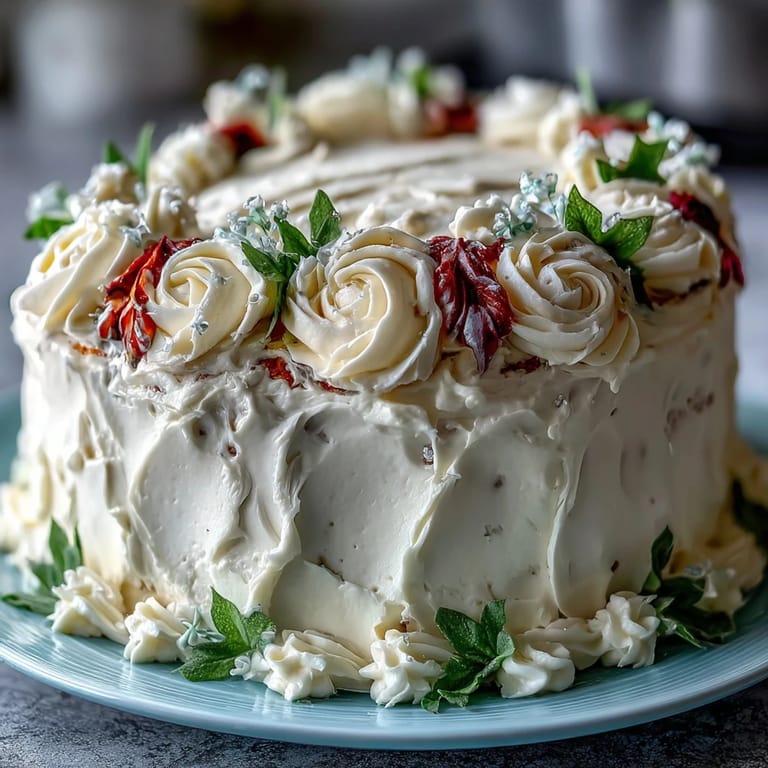
 My cousin walked across that stage on a brilliant June afternoon, and I'd promised her something special for the backyard celebration after. Standing in my kitchen with flour dust catching the light, I realized this cake needed to be more than just dessert—it had to feel like an accomplishment on a plate. That's when I settled on this sheet cake, generous enough to feed a crowd but elegant enough that nobody would guess how manageable it actually is to decorate.
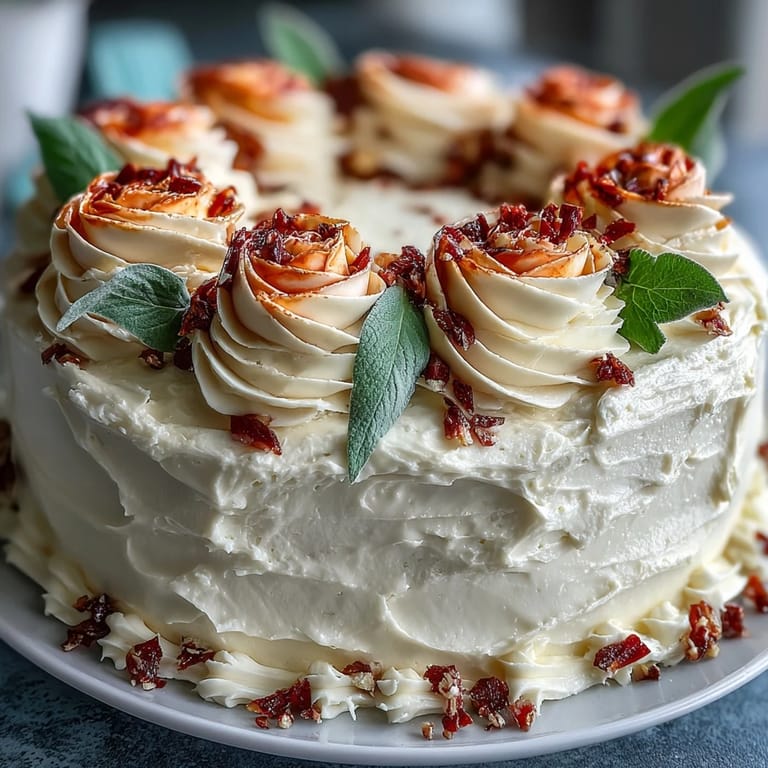
I'll never forget my sister's face when she saw those roses piped across the cake—she grabbed her phone immediately to photograph it before anyone could touch a slice. What made her happiest wasn't the decoration though, it was knowing someone had taken time to create something beautiful specifically for her milestone. That's the real magic of this cake.
What's for Dinner Tonight? 🤔
Stop stressing. Get 10 fast recipes that actually work on busy nights.
Free. No spam. Just easy meals.
Ingredients
- All-purpose flour (3 cups): Make sure it's measured by spooning and leveling, not scooping straight from the bag, or your cake will turn dense and heavy.
- Baking powder and baking soda (2½ tsp and ½ tsp): Check your leavening agents before you start—old ones lose their lift and your cake won't rise properly.
- Salt (½ tsp): This tiny amount enhances the vanilla flavor in ways people can't quite identify but absolutely taste.
- Unsalted butter (1 cup for cake, 1½ cups for frosting): Room temperature is non-negotiable here—cold butter won't cream properly with sugar, and you'll end up with a dense crumb.
- Granulated sugar (2 cups): This creams with the butter to create air pockets that make the cake light and tender.
- Eggs (4 large): Room temperature eggs incorporate smoothly into the batter, which means a more even texture throughout.
- Vanilla extract (1 tbsp for cake, 2 tsp for frosting): This is what people taste when they think vanilla—use real extract, not imitation.
- Whole milk (1¼ cups for cake, ¼ cup for frosting): Room temperature milk prevents shocking the batter and keeps everything mixing evenly.
- Powdered sugar (6 cups): Sift it before measuring to break up clumps that would make lumpy frosting.
- Gel food coloring (assorted): Gel coloring gives you vibrant hues without adding extra liquid that thins your frosting.
Instructions
- Prepare your pan and oven:
- Set your oven to 350°F and grease a 12x18-inch sheet pan generously, then line it with parchment so the cake lifts out cleanly.
- Mix your dry ingredients:
- Whisk flour, baking powder, baking soda, and salt together in a medium bowl—this distributes the leavening evenly so you don't get random tunnels in your cake.
- Cream butter and sugar:
- Beat room-temperature butter with sugar for 3-4 minutes until it's pale, fluffy, and looks almost like frosting. You're literally whipping air into the mixture, which is what makes the cake tender.
- Add eggs one by one:
- Drop in each egg and beat well before adding the next—rushing this step means unincorporated egg whites and a less uniform crumb.
- Mix in vanilla:
- A quick splash of vanilla goes in after all the eggs are incorporated.
- Alternate dry and wet ingredients:
- Start with flour, then milk, then flour again, mixing only until just combined. Overmixing develops gluten and toughens your cake, which defeats the purpose of creaming.
- Pour and bake:
- Spread batter into your prepared pan and smooth the top gently. Bake for 30-35 minutes until a toothpick comes out clean or with a few moist crumbs.
- Cool completely:
- Let the cake rest in the pan on a wire rack for at least an hour, or it will crumble when you try to frost it.
- Make the buttercream:
- Beat room-temperature butter until it's creamy and pale, then gradually add sifted powdered sugar so it doesn't cloud the air. Add milk and vanilla and beat for about 5 minutes until it's silky smooth.
- Tint your frosting:
- Divide the buttercream into separate bowls and add gel coloring a tiny bit at a time—you can always add more, but you can't take it out.
- Crumb coat first:
- Spread a thin layer of white buttercream all over the cake to seal in crumbs, then refrigerate for 15 minutes before piping your roses.
- Pipe your roses and leaves:
- Use a petal tip for the roses and a leaf tip for greenery, working across the cake in clusters. If you've never piped before, practice on parchment first.
- Add your message:
- Write the graduation sentiment with a small round piping tip in a color that contrasts with your base frosting.
 Save to Pinterest
 There's a particular joy in watching someone's eyes light up when they see a cake decorated just for them. This sheet cake has that power because it's big enough to feel celebratory but still feels handmade and personal.
The Piping Rose Technique That Actually Works
I spent an embarrassing amount of time watching piping videos before I attempted my first rose, convinced I needed some special talent I didn't possess. What I learned is that roses are forgiving—they don't need to be perfect, they just need layers of petals. Start with a small base of frosting on your piping tip, then pipe a petal by applying pressure and releasing, overlapping slightly as you spiral upward. Each petal looks more like a rose than the last, and by the time you're halfway done, you'll stop worrying about perfection.
Scaling This Cake for Different Crowds
A 12x18-inch pan serves 24, but not every celebration is that size. If you need fewer servings, a 9x13-inch rectangular pan uses the same batter and bakes in about 30 minutes—just reduce everything else proportionally. For larger crowds, you can make this recipe twice without any stress, or bake two cakes side by side if your oven is spacious enough.
Flavor Variations and Storage
Vanilla is classic, but this cake welcomes experimentation without complaint. For a chocolate version, swap ¾ cup of the flour for unsweetened cocoa powder and add a touch of espresso powder to deepen the flavor. Lemon zest stirred into the buttercream brightens everything up, and almond extract mixed half-and-half with vanilla creates something subtly different. Leftovers keep covered at room temperature for two days, but if you're in a warm climate, refrigerate them after the first day. Frozen unfrosted cake layers will last up to three months, which is wonderful for getting a head start on party prep.
- Make a chocolate ganache drip along the edges instead of (or alongside) the roses for drama.
- If piping feels intimidating, spread frosting artfully with an offset spatula and scatter edible pearls or fresh flowers instead.
- Bake the cake the day before decorating to reduce day-of stress and ensure perfectly cool cake for frosting.
 Save to Pinterest
 Cakes like this one exist in that sweet spot where they're impressive enough to mark a milestone but accessible enough that anyone willing to try can pull it off. That's exactly what a graduation celebration deserves.
Recipe Q&A
- → How do I achieve moist and tender cake layers?
Use room temperature ingredients and alternate adding dry and wet components to avoid overmixing, which keeps the crumb soft.
- → What is the best way to pipe buttercream roses?
Use a petal tip and apply steady pressure while rotating the piping bag to create delicate, layered petals for realistic roses.
- → Can the buttercream hold its shape for detailed decorations?
Yes, buttercream beaten until smooth and fluffy holds its shape well, especially after chilling briefly to firm up.
- → How can I ensure vibrant color in the frosting decorations?
Gel food coloring is recommended as it provides rich hues without altering frosting consistency.
- → What is a good storage method for this cake?
Keep the decorated cake covered at room temperature for two days or refrigerated up to five, ensuring it’s well protected from air exposure.